[Originally published April 22, 2019]
Happy Earth Day 2019! This one has an odd name, I know. It was inspired by a picture of a person stacking rocks by a river. Others have seen a collection of those painted kindness rocks. It might also just be an interesting organic design that doesn’t have to mean anything.

This pillow is part of a larger project I called #10pillowsfor10teachers. You can see more about that here.
It’s very simple to make, and I’ll show you how I did it.
.

The background is Kaufman Essex linen. I had scraps of solids and spent some time choosing my palette based on this background.

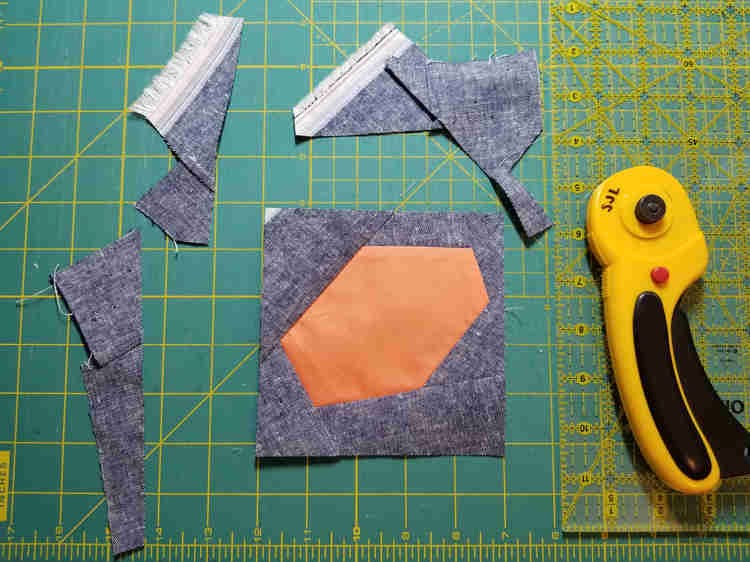
My pillow ended up being about 18″ square, finished. The starting pieces like this solid peach here were about 3.5″ by 5″. This is improv, so we don’t need to be exact. Grab a scrap to get started.

Sew a piece of background onto a corner. Trim seam allowance and press. Sew another piece of background on the next corner, trim. This is the whole process, really. Just keep circling around, sewing on background pieces until you have roughly a rock shaped thing.
One key is to make sure the background pieces you add are far enough in so that your “rock” doesn’t extend into the 1/4″ edge of the square. If it does, no big deal. Add another background piece before you trim it. I trimmed these to 5″ square.

Make more rocks. You’ll start to get a rhythm for adding the background to your solid pieces to make the rock-like blocks. On some of these, I started on a corner then went around (the peach one), on others I hacked off the corners first then added wonky sides (red).

I spent some time arranging and rearranging until I liked the color references between all the blocks. This was like version 487 before the final layout.

Then you magically fast forward in time to having all the blocks assembled, adding 2.5″ strips to the top and bottom, and quilting it. I chose to channel quilt it using denim colored thread. Behind the batting is just muslin, no need to spend on the backing here as it will be inside the pillow, plus it’s thin so, less bulk.
Now, you can turn your quilted top into a pillow via the method of your choice, but I HIGHLY recommend the tutorial for finishing a pillow with a zippered back here. All enclosed seams! No need to change to a zipper foot! Thank you X1000, Svetlana of S.O.T.A.K. It’s my very favorite method.